|
|
|
|
|
|
|
|
|
|
|
|
|
|
|
Arterial cannulation with continuous pressure transduction and waveform display remains the accepted reference standard for blood pressure monitoring despite the fact that it is more costly, has the potential for more complications, and requires more technical expertise to initiate and maintain than noninvasive monitoring does. There are a number of reasons why clinicians should use this form of invasive pressure monitoring ( Table 32-2 ). First and foremost, direct arterial pressure should be used when moment-to-moment blood pressure changes are anticipated and rapid detection of them is considered to be vital. Familiar examples include cardiac surgery with cardiopulmonary bypass, deliberate induced hypotension, vascular surgery with major arterial clamping, and anticipated need for infusion of vasoactive drugs. These conditions typically apply to patients with severe preexisting cardiovascular disease or hemodynamic instability or when the planned operative procedure is likely to cause large, sudden cardiovascular changes, rapid blood loss, or large fluid shifts. The Australian Incident Monitoring Study of 1993 confirmed the superiority of direct arterial pressure monitoring over indirect monitoring techniques for the early detection of intraoperative hypotension. [72]
In addition to continuous pressure monitoring, arterial catheterization
provides reliable vascular access and obviates the need for multiple arterial or
venous punctures for frequent blood sampling. Because of a variety of patient-related
conditions, NIBP measurement may be inaccurate or prove technically impossible in
some individuals, such as those with morbid obesity, burned extremities, or shock.
[30]
In these cases, direct arterial pressure monitoring
| Continuous, real-time blood pressure monitoring |
| Planned pharmacologic or mechanical cardiovascular manipulation |
| Repeated blood sampling |
| Failure of indirect arterial blood pressure measurement |
| Supplementary diagnostic information from the arterial waveform |
Perhaps the most underemphasized value of direct arterial pressure monitoring is that arterial pressure waveform analysis may provide many important diagnostic clues to the patient's condition. More than a half century ago, Eather and colleagues emphasized these diagnostic insights in a paper that first introduced and advocated direct monitoring of "arterial pressure and pressure pulse contours" in anesthetized patients.[73] Some of these diagnostic insights are readily apparent and commonly sought, such as identification of the arterial dicrotic notch to guide proper timing for intra-aortic balloon counterpulsation, whereas others are more subtle, such as recognition of excessive variation in systolic blood pressure as a sign of hypovolemia.[74]
The radial artery is the most common site for invasive blood pressure monitoring in anesthesia and critical care because it is technically easy to cannulate and complications are uncommon, in part owing to the good collateral circulation of the hand.[75] For example, Slogoff and coauthors described 1700 cardiovascular surgical patients who underwent radial artery cannulation without ischemic complications despite evidence of radial artery occlusion after decannulation in more than 25% of patients.[76] Before attempting radial artery cannulation, many clinicians assess the adequacy of collateral flow to the hand by performing a modified Allen test. This bedside examination, originally described by E. V. Allen in 1929, provided a technique to assess arterial stenosis in the hands of patients with thromboangiitis obliterans. [77] To perform the Allen test, the examiner compresses the radial and ulnar arteries and asks the patient to make a tight fist to exsanguinate the palm. The patient then opens the fist while avoiding hyperextension of the wrist or fingers, and as occlusion of the ulnar artery is released, the color of the open palm is observed. Normally, the palm will have a striking flush in several seconds; severely reduced ulnar collateral flow is present when the palm remains pale for more than 10 seconds.
Although the Allen test is often used to identify patients at high risk for ischemic complications from radial artery catheterization, the predictive value of this test has been questioned. Many reports of permanent ischemic sequelae note that a normal Allen test result was present before catheterization.[78] [79] [80] [81] In contrast, there are many descriptions of uncomplicated radial artery catheterization despite the presence of an abnormal Allen test before the procedure.[76] [82] [83] Although most patients show radial artery dominance with respect to overall hand perfusion, total radial artery occlusion does not appear to compromise distal perfusion.[84] Furthermore, Allen test results bear little relation to distal blood flow, as measured by fluorescein dye injection[85] or photoplethysmography. [86] Although it is obviously of great importance that the clinician minimize the chance of significant distal ischemia from arterial pressure monitoring, it appears that the Allen test cannot be relied on to avoid this adverse outcome.
Consistent, successful radial artery cannulation should be easily achievable with attention to a number of
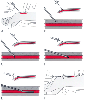 Figure 32-4
Percutaneous radial artery cannulation. A,
The wrist is positioned and the artery identified by palpation. B,
The catheter-over-needle assembly is introduced through the skin and advanced toward
the artery. C, Entry of the needle tip into the artery
is identified by the flash of arterial blood in the needle hub reservoir. D,
The needle-catheter assembly is advanced at a lower angle to ensure entry of the
catheter tip into the vessel. E, If blood flow continues
into the needle reservoir, the catheter is advanced gently over the needle into the
artery. F, The catheter is attached to pressure monitoring
tubing while maintaining proximal occlusive pressure on the artery.
Figure 32-4
Percutaneous radial artery cannulation. A,
The wrist is positioned and the artery identified by palpation. B,
The catheter-over-needle assembly is introduced through the skin and advanced toward
the artery. C, Entry of the needle tip into the artery
is identified by the flash of arterial blood in the needle hub reservoir. D,
The needle-catheter assembly is advanced at a lower angle to ensure entry of the
catheter tip into the vessel. E, If blood flow continues
into the needle reservoir, the catheter is advanced gently over the needle into the
artery. F, The catheter is attached to pressure monitoring
tubing while maintaining proximal occlusive pressure on the artery.
Next, the arterial catheter is checked for frictionless movement over the needle. The sterile plastic casing surrounding the catheter should be removed and inserted into the needle hub to serve as a reservoir for the blood that pulses out when the artery is entered, or alternatively, a small syringe with the plunger removed should be used as a blood reservoir. Although a 20-gauge Teflon catheter is most commonly used for radial artery cannulation, the size (20- or 18-gauge) and composition (Teflon or polypropylene) of the catheter seem to have little influence on the frequency of complications.[76] The catheter is advanced toward the palpated artery at a comfortable angle, generally 30 to 45 degrees, and successful entry of the needle tip into the artery is confirmed by the "flash" of arterial blood flow into the needle hub and reservoir.
Because the needle protrudes slightly beyond the tip of the catheter, the needle tip is the only portion of the needle-catheter assembly that may have entered the arterial lumen when the flash of blood is first identified. To thread the catheter into the artery, the catheter angle should be reduced and the needle-catheter assembly advanced several millimeters (see Fig. 32-4 ). If blood continues to flow into the needle reservoir, it is certain that the needle and catheter are both within the lumen of the radial artery, and the catheter alone can now be advanced gently into the artery.
Failure to recognize that the needle is the leading edge of the needle-catheter assembly is responsible for most technical failures by inexperienced operators who try to advance the catheter into the radial artery when only the needle tip has entered the lumen. The catheter then "fails to thread" because its tip has not yet entered the radial artery. One should never try to advance the catheter unless blood is flowing into the collecting reservoir, thereby confirming that the catheter tip is within the arterial lumen. Once the catheter is fully advanced into the vessel lumen, the radial artery is occluded by applying proximal pressure, the needle is removed, the monitoring system pressure tubing is fastened to the catheter, an appropriate sterile dressing is applied, and the apparatus is securely taped or sutured to the wrist.
Some clinicians choose the "transfixion" technique for arterial cannulation, in which the front and back walls of the artery are punctured intentionally, the needle is removed from the catheter, and the catheter is withdrawn into the vessel lumen. Although it is unnecessary to place an additional hole in the back wall of the radial artery for successful cannulation, the technique per se does not appear to influence the incidence of postcannulation arterial thrombosis.[83] [87] [88]
If the needle punctures the back wall of the artery, it is not a grievous error as long as the operator recognizes it by observing that blood no longer enters the needle reservoir. Either the needle tip alone or both the needle and the catheter tips have pierced the back wall of the artery, and one can often determine which has occurred. At this point, one should not withdraw the entire needle-catheter assembly; rather, the needle alone should be retracted several millimeters into the catheter, thereby making the catheter tip the "leading edge." If arterial blood flow reappears in the collection reservoir, the catheter tip should be within the vessel lumen, and the catheter now may be advanced fully. Alternatively, if retraction of the needle into the catheter fails to restore blood flow into the collection reservoir, the catheter is pulled back slowly until pulsatile blood flow reappears,
When one is unsuccessful in threading the catheter into the artery, a sterile guidewire may be passed through the catheter into the artery to aid insertion. Many arterial cannulation kits have integrated needle-guidewire-catheter assemblies for this purpose. When these devices are used, the needle tip is introduced into the artery, the wire is inserted through the needle once arterial flow is detected, and the catheter is then inserted over the guidewire. Although some authors have suggested that guidewire-based techniques will improve arterial cannulation success rates in some patients,[89] it appears that success is more a function of operator experience and personal preference.[90]
If the radial arteries are unsuitable for pressure monitoring, several alternative cannulation sites are available. The ulnar artery is cannulated by using a technique much like that described for the radial artery. Even in circumstances in which previous attempts to cannulate the ipsilateral radial artery have failed, the ulnar artery may be cannulated safely. [76] However, adequacy of collateral flow from the radial artery to the hand should be established before this procedure with a modified Allen test in which one releases radial artery occlusion, maintains ulnar artery compression, and observes restoration of flow to the hand.
Although the brachial artery does not have the anatomic benefit of the collateral circulation present in the hand, clinical trials have confirmed the safety of this cannulation site.[91] [92] Bazaral and coauthors reported the use of more than 3000 brachial artery catheters in patients undergoing cardiac surgery over a 3-year period, with only one patient requiring a postoperative thrombectomy and no untoward sequelae.[93] A slightly longer catheter is preferred for the brachial site because of the need for the catheter to traverse the elbow joint. Other peripheral arteries occasionally chosen for pressure monitoring include the dorsalis pedis, posterior tibial, and superficial temporal arteries. The dorsalis pedis and posterior tibial arteries form the same collateral circulation to the foot that the radial and ulnar arteries provide to the hand. However, this anatomic safety feature is more theoretical than real in older adults because of the high incidence of lower extremity vascular disease in many of these same patients who require direct arterial pressure monitoring. Consequently, successful clinical experience using these smaller peripheral arteries for pressure monitoring has been reported predominantly in children.[94]
The axillary artery provides another site for long-term pressure monitoring. Advantages include patient comfort and mobility and access to a central arterial pressure waveform, and complications appear to be infrequent.[95] [96] A wire-guided catheterization technique and a longer indwelling catheter may improve the success rate of axillary cannulation. If the axillary approach is chosen, the left side is preferred because its tip will lie distal to the aortic arch and great vessels. Clinicians should be aware, however, that the risk of cerebral embolization is increased whenever more centrally located arterial catheters are used.
The femoral artery is the largest artery commonly selected for pressure monitoring, and it appears to have a safety record comparable to that of other sites.[97] [98] [99] As with axillary artery pressure monitoring, the femoral artery waveform more closely resembles aortic pressure than do waveforms recorded from peripheral sites. When compared with radial artery catheterization, the risk of distal ischemia after femoral artery cannulation may be reduced because of the large diameter of the artery, but atherosclerotic plaque embolization is more likely during initial guidewire and catheter placement. Although some investigators have shown an increase in infectious complications with femoral artery catheters, [96] [100] others have not shown an increased risk.[98] [99] [101] Catheterization of the femoral artery is best achieved with a guidewire technique. The operator must be careful to puncture the femoral artery below the inguinal ligament, thereby limiting the risk of arterial injury causing uncontained hemorrhage into the pelvis or peritoneum, a potentially catastrophic complication.[102] [103]
The widespread application of invasive arterial pressure monitoring in anesthesia and intensive care is related, no doubt, to the extremely good safety record of this technique. Large clinical investigations confirm the low incidence of long-term complications after radial artery cannulation, in particular, the small risk of distal ischemia, which is probably less than 0.1%.[75] [76] Although vascular complications from radial artery cannulation are rare, a number of factors have been identified that may increase the risk, including vasospastic arterial disease, previous arterial injury, thrombocytosis, protracted shock, high-dose vasopressor administration, prolonged cannulation, and infection.[78] [104] [105]
The Australian Incident Monitoring Study provides some noteworthy observational data on the incidence and types of complications of blood pressure monitoring.[72] [106] Of 2000 untoward clinical events reported in this investigation, only 13 were related to peripheral arterial cannulation, fewer than the number associated with central venous or peripheral venous cannulation (18 and 33 incidents, respectively). Five of these 13 cases involved equipment faults or misassembly, in 3 cases the arterial line was mistaken for an intravenous line and used for drug injection, in 3 cases the arterial line was either disrupted or kinked, in 1 case a fragment of guidewire broke off inside the patient, and in only 1 instance did transient vasospasm follow radial artery cannulation.[106] A second report from this study, which focused entirely on blood pressure monitoring, noted that direct pressure monitoring failed or gave misleading results in 10 instances, including 5 in which there was either incorrect calibration, incorrect interpretation of the pressure display, or unrecognized subclavian artery stenosis.[72]
Certain clinically relevant conclusions can be drawn from these data. First, it is striking that many, if not most of the complications from direct arterial pressure monitoring can be attributed to equipment misuse. This serves to highlight the importance of proper operator knowledge,
| Distal ischemia, pseudoaneurysm, arteriovenous fistula |
| Hemorrhage |
| Arterial embolization |
| Infection |
| Peripheral neuropathy |
| Misinterpretation of data |
| Misuse of equipment |
Serious complications, though rare, do occur after arterial cannulation ( Table 32-3 ). Reports describe pseudoaneurysm and arteriovenous fistula formation,[107] retained guidewire requiring surgical extraction,[108] fatal hemorrhage after difficult femoral artery cannulation,[102] and upper extremity compartment syndrome after brachial artery cannulation.[109] In almost all cases, however, there were technical problems during catheter placement or confounding medical problems such as shock or coagulopathy. Infectious complications are increasingly rare now that disposable transducers have replaced reusable ones. Because retrograde arterial embolism is possible whenever forceful flushing of a peripheral arterial catheter is performed,[110] special care should be exercised whenever more centrally located arterial catheters are used, including those in the superficial temporal artery or axillary artery or when monitoring from the central lumen of an intra-aortic balloon pump in the descending aorta.
Direct measurement of arterial blood pressure requires that the pressure waveform from the cannulated artery be reproduced accurately on the bedside monitor. Not surprisingly, the displayed pressure signal is influenced significantly by the measuring system, including the arterial catheter, extension tubing, stopcocks, flush devices, transducer, amplifier, and recorder.[51] [111] [112] [113] Consequently, it is important to understand how the monitoring system may influence the contour of the pressure waveform and the measured values for blood pressure.
The direct blood pressure monitoring systems used in the operating room and intensive care units are described as underdamped second-order dynamic systems. [111] [113] [114] [115] [116] [117] [118] [119] These fluid-filled, catheter-transducer monitoring systems may be modeled after simple mass-spring systems. Intuitively, when the mass at the end of a spring is displaced and then released, a characteristic simple harmonic motion is observed. Clinical blood pressure monitoring systems exhibit similar physical behavior that depends on three characteristic physical properties: elasticity, mass, and friction. These three properties determine the system operating characteristics, termed the frequency response or dynamic response, which in turn is characterized by two important system parameters, natural frequency (fn , ω) and damping coefficient (ζ, Z, α, D). The natural frequency of the monitoring system quantifies how rapidly the system oscillates, and the damping coefficient quantifies the frictional forces that act on the system and determine how rapidly it comes to rest. Both parameters may be estimated or measured at the bedside, and they dramatically influence the appearance of the recorded pressure waveform.
The arterial blood pressure waveform is a periodic complex wave that can be reproduced by Fourier analysis, which recreates the original complex pressure wave by summing a series of simpler sine waves of different amplitudes and frequencies.[113] [120] The original pressure wave has a characteristic periodicity termed the fundamental frequency, which is equal to the pulse rate. Although the pulse rate is reported in beats per minute, fundamental frequency is reported in cycles per second or Hertz (Hz). For example, a pulse rate of 60 beats/min equals 1 beat/sec or 1 cycle/sec or 1 Hz.
The sine waves that sum to produce the complex wave have frequencies that are multiples or harmonics of the fundamental frequency. A crude arterial waveform that displays a systolic upstroke, systolic peak, dicrotic notch, and so forth can be reconstructed with reasonable accuracy from two sine waves, the fundamental frequency and the second harmonic ( Fig. 32-5 ). If the original arterial pressure waveform contains high-frequency components such as a steep systolic upstroke, higher-frequency sine waves (and more harmonics) are needed to provide a faithful reconstruction of the original pressure waveform. As a general rule, 6 to 10 harmonics are required to provide
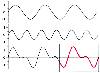 Figure 32-5
Arterial blood pressure waveform produced by the summation
of sine waves. The fundamental wave (top) added
to 63% of the second harmonic wave (middle) results
in a pressure wave (bottom) that resembles an arterial
blood pressure waveform (box). (Redrawn
from Mark JB: Atlas of Cardiovascular Monitoring. New York, Churchill Livingstone,
1998, Fig. 9-1.)
Figure 32-5
Arterial blood pressure waveform produced by the summation
of sine waves. The fundamental wave (top) added
to 63% of the second harmonic wave (middle) results
in a pressure wave (bottom) that resembles an arterial
blood pressure waveform (box). (Redrawn
from Mark JB: Atlas of Cardiovascular Monitoring. New York, Churchill Livingstone,
1998, Fig. 9-1.)
If the monitoring system has a natural frequency that is too low, frequencies in the monitored pressure waveform will approach the natural frequency of the measurement system. As a result, the system will resonate, and pressure waveforms recorded on the monitor will be exaggerated or amplified versions of true intra-arterial pressure ( Fig. 32-6 ). This phenomenon is the familiar arterial pressure waveform that displays overshoot, ringing, or resonance, and the systolic blood pressure recorded overestimates intra-arterial pressure. Tachycardia and steep systolic pressure upstrokes present the greatest challenge for clinical monitoring systems because the higher-frequency content of these waveforms more likely approaches the resonant frequency of the measurement system.
In addition to a sufficiently high natural frequency, the bedside monitoring system must also have an appropriate damping coefficient. An overdamped arterial pressure waveform is recognized by its slurred upstroke, absent dicrotic notch, and loss of fine detail. Severely overdamped pressure waves display a falsely narrowed pulse pressure, although MAP may remain reasonably accurate ( Fig. 32-7 ). In contrast, underdamped pressure waveforms display systolic pressure overshoot and contain additional artifacts produced by the measurement
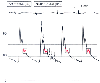 Figure 32-6
Underdamped arterial pressure waveform. Systolic pressure
overshoot and additional small, nonphysiologic pressure waves (arrows)
distort the waveform and make it hard to discern the dicrotic notch (boxes).
Digital values displayed for direct arterial blood pressure (ART 166/56, mean of
82 mm Hg) and noninvasive blood pressure (NIBP 126/63, mean of 84 mm Hg) show the
differences in pressure measurement that arise because of an underdamped arterial
pressure waveform. (Redrawn from Mark JB: Atlas of Cardiovascular Monitoring.
New York, Churchill Livingstone, 1998, Fig. 9-4.)
Figure 32-6
Underdamped arterial pressure waveform. Systolic pressure
overshoot and additional small, nonphysiologic pressure waves (arrows)
distort the waveform and make it hard to discern the dicrotic notch (boxes).
Digital values displayed for direct arterial blood pressure (ART 166/56, mean of
82 mm Hg) and noninvasive blood pressure (NIBP 126/63, mean of 84 mm Hg) show the
differences in pressure measurement that arise because of an underdamped arterial
pressure waveform. (Redrawn from Mark JB: Atlas of Cardiovascular Monitoring.
New York, Churchill Livingstone, 1998, Fig. 9-4.)
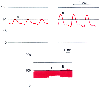 Figure 32-7
Overdamped arterial pressure waveform. The overdamped
pressure waveform (A) shows a diminished pulse pressure
when compared with the normal waveform (B). The
slow-speed recording below demonstrates a 3-minute period of damped arterial pressure.
Despite the damped pressure waveform, mean arterial pressure remains unchanged during
this period. (Redrawn from Mark JB: Atlas of Cardiovascular Monitoring.
New York, Churchill Livingstone, 1998, Fig. 9-3.)
Figure 32-7
Overdamped arterial pressure waveform. The overdamped
pressure waveform (A) shows a diminished pulse pressure
when compared with the normal waveform (B). The
slow-speed recording below demonstrates a 3-minute period of damped arterial pressure.
Despite the damped pressure waveform, mean arterial pressure remains unchanged during
this period. (Redrawn from Mark JB: Atlas of Cardiovascular Monitoring.
New York, Churchill Livingstone, 1998, Fig. 9-3.)
Most catheter-tubing transducer systems are underdamped but have an acceptable natural frequency that exceeds 12 Hz. If the system's natural frequency is lower than 7.5 Hz, the pressure waveform is often distorted, and no amount of damping adjustment can restore the monitored waveform to adequately resemble the original waveform.[51] [111] If, on the other hand, the natural frequency can be increased sufficiently (e.g., 24 Hz), damping will have minimal effect on the monitored waveform, and faithful reproduction of intravascular pressure is achieved more easily ( Fig. 32-8 and Fig. 32-9 ). In other words, the lower the natural frequency of the monitoring system, the more narrow the range of damping coefficients that can be tolerated to ensure faithful reproduction of the pressure wave or adequate dynamic response. For example, if the monitoring system's natural frequency is 10 Hz, the damping coefficient must be between 0.45 and 0.6 for accurate pressure waveform monitoring. If the damping coefficient is too low, the monitoring system will be underdamped, resonate, and display factitiously elevated systolic blood pressure. In contrast, if the damping coefficient is too high, the system will be overdamped, systolic pressure will be falsely decreased, and fine detail in the pressure trace will be lost.
From these considerations, it follows that a pressure monitoring system will have optimal dynamic response
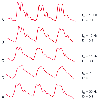 Figure 32-8
Interaction between damping coefficient (D) and natural
frequency (fn
) in pressure waveform recordings. A,
An underdamped pressure waveform (fn
= 10 Hz, D = 0.1) displays small
artifactual waves and systolic pressure overshoot. B,
A small increase in D (0.2) diminishes these artifacts. C,
Critical damping (D = 0.4) provides an accurate pressure waveform, even though fn
remains low. D, Overdamping results in loss of fine
detail and precludes determination of fn
or D. E,
Increased fn
(20 Hz) allows a low D (0.1) to have minimal impact on waveform
morphology. Notice the similarities between waveforms C
and E. (Redrawn from Mark JB: Atlas of Cardiovascular
Monitoring. New York, Churchill Livingstone, 1998, Fig. 9-7.)
Figure 32-8
Interaction between damping coefficient (D) and natural
frequency (fn
) in pressure waveform recordings. A,
An underdamped pressure waveform (fn
= 10 Hz, D = 0.1) displays small
artifactual waves and systolic pressure overshoot. B,
A small increase in D (0.2) diminishes these artifacts. C,
Critical damping (D = 0.4) provides an accurate pressure waveform, even though fn
remains low. D, Overdamping results in loss of fine
detail and precludes determination of fn
or D. E,
Increased fn
(20 Hz) allows a low D (0.1) to have minimal impact on waveform
morphology. Notice the similarities between waveforms C
and E. (Redrawn from Mark JB: Atlas of Cardiovascular
Monitoring. New York, Churchill Livingstone, 1998, Fig. 9-7.)
Because typical clinical blood pressure monitoring systems are underdamped and display some degree of systolic pressure overshoot, it is tempting to try to increase the damping in the system by introducing a small air bubble into the monitoring tubing line, but this should not be done. Aside from the obvious risk of arterial air embolism and the potential for retrograde flushing of the air bubble into the cerebral circulation,[110] the air bubble will not improve the dynamic response of the system because any increase in system damping is always accompanied by a decrease in its natural frequency. Somewhat paradoxically, resonance in the system may increase and systolic pressure overshoot may be even greater because of the reduced natural frequency of the monitoring system. In this example ( Fig. 32-10 ), a 0.1-mL air bubble markedly dampens the system but lowers the natural frequency and causes an artifactual 25-mm Hg increase in systolic pressure.
 Figure 32-9
Interaction between damping coefficient and natural frequency.
Depending on these two system parameters, catheter tubing-transducer systems fall
into one of five different dynamic response ranges. Systems with an optimal dynamic
response will faithfully record the most demanding pressure waveforms, whereas those
with an adequate dynamic response will accurately record most pressure waveforms
seen in clinical practice. Overdamped and underdamped systems introduce artifacts
characteristic of these technical limitations. Systems with a natural frequency
of less than 7 Hz are considered unacceptable. The rectangular
crosshatched box indicates the ranges of damping coefficients and natural
frequencies commonly encountered in clinical pressure measurement systems. The point
within the box shows the mean values of 30 such systems recorded by Schwid.[122]
(Redrawn from Mark JB: Atlas of Cardiovascular Monitoring. New York, Churchill
Livingstone, 1998, Figs. 9-6, 9-8, and 9-11.)
Figure 32-9
Interaction between damping coefficient and natural frequency.
Depending on these two system parameters, catheter tubing-transducer systems fall
into one of five different dynamic response ranges. Systems with an optimal dynamic
response will faithfully record the most demanding pressure waveforms, whereas those
with an adequate dynamic response will accurately record most pressure waveforms
seen in clinical practice. Overdamped and underdamped systems introduce artifacts
characteristic of these technical limitations. Systems with a natural frequency
of less than 7 Hz are considered unacceptable. The rectangular
crosshatched box indicates the ranges of damping coefficients and natural
frequencies commonly encountered in clinical pressure measurement systems. The point
within the box shows the mean values of 30 such systems recorded by Schwid.[122]
(Redrawn from Mark JB: Atlas of Cardiovascular Monitoring. New York, Churchill
Livingstone, 1998, Figs. 9-6, 9-8, and 9-11.)
As an alternative to placing air bubbles in the monitoring system, devices can be added to increase damping without lowering the natural frequency (see Fig. 32-8 ). These devices improve impedance matching, which eliminates wave reflections and prevents resonance in the monitoring system.[111] [115] [119] Although some have advocated the use of these devices in monitoring systems,[111] others have highlighted the limitations of these devices, including an inability to adjust or tune the monitoring system to provide the most accurate in vivo pressure recordings. [44] [119]
Even though limiting the pressure monitoring system to short extension tubing will optimize the system's dynamic response, clinical circumstances often require longer extension tubing, stopcocks for blood drawing, and other in-line sampling and flush devices. Thus, it becomes important to be able to assess the amount of distortion existing in the monitoring system in clinical use. Although one cannot accurately predict the total system's natural frequency or damping coefficient from knowledge of the values for individual system components,[112] the fast-flush test provides a convenient bedside method for determining these vital system performance parameters. This test can be performed without additional equipment beyond the normal monitors and recorders, and it assesses the dynamic response of the entire monitoring system, from catheter tip to transducer. Furthermore, it
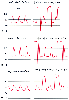 Figure 32-10
Effect of small air bubbles within arterial pressure
monitoring systems. Arterial pressure waveforms are displayed along with superimposed
fast flush square-wave artifacts. A, The original
monitoring system has an adequate dynamic response (natural frequency, 17 Hz; damping
coefficient, 0.2). B, A small 0.1-mL air bubble added
to the monitoring system produces a paradoxical increase in arterial blood pressure.
Note the decreased natural frequency of the system. C,
A larger 0.5-mL air bubble further degrades the dynamic response and produces spurious
arterial hypotension. (Redrawn from Mark JB: Atlas of Cardiovascular Monitoring.
New York, Churchill Livingstone, 1998, Fig. 9-14.)
Figure 32-10
Effect of small air bubbles within arterial pressure
monitoring systems. Arterial pressure waveforms are displayed along with superimposed
fast flush square-wave artifacts. A, The original
monitoring system has an adequate dynamic response (natural frequency, 17 Hz; damping
coefficient, 0.2). B, A small 0.1-mL air bubble added
to the monitoring system produces a paradoxical increase in arterial blood pressure.
Note the decreased natural frequency of the system. C,
A larger 0.5-mL air bubble further degrades the dynamic response and produces spurious
arterial hypotension. (Redrawn from Mark JB: Atlas of Cardiovascular Monitoring.
New York, Churchill Livingstone, 1998, Fig. 9-14.)
To perform this test, the fast-flush valve is opened briefly several times, and the resulting flush artifact is examined. The monitoring system's natural frequency is related to the time period or distance between two successive oscillation cycles. An example is illustrated in Figure 32-11 , where the distance between two cycles is 1.7 mm at a recorder speed of 25 mm/sec (standard ECG speed). Natural frequency is then easily calculated: 1 cycle/1.7 mm × 25 mm/sec = 14.7 cycles/sec or 14.7 Hz. Note that the distance between successive oscillation cycles (i.e., cycles 1 to 2, 2 to 3) should be identical because this is a fundamental characteristic of the measurement system—its natural frequency. Furthermore, the tighter the oscillation cycles, the higher
 Figure 32-11
Clinical measurement of natural frequency and damping
coefficient. A, Two square-wave fast-flush artifacts
interrupt an arterial pressure waveform recorded on standard 1-mm grid paper at a
speed of 25 mm/sec. Natural frequency is determined by measuring the period of one
cycle of adjacent oscillation peaks (1.7 mm). The damping coefficient is determined
by measuring the heights of adjacent oscillation peaks (17 and 24 mm). From these
measurements, a natural frequency of 14.7 Hz and an amplitude ratio of 0.71 may be
calculated. See the text for greater detail. B,
Relationship between the amplitude ratio and the damping coefficient. The amplitude
ratio determined in the fast-flush test in A corresponds
to a damping coefficient of 0.11. (Redrawn from Mark JB: Atlas of Cardiovascular
Monitoring. New York, Churchill Livingstone, 1998, Figs. 9-9 and 9-10.)
Figure 32-11
Clinical measurement of natural frequency and damping
coefficient. A, Two square-wave fast-flush artifacts
interrupt an arterial pressure waveform recorded on standard 1-mm grid paper at a
speed of 25 mm/sec. Natural frequency is determined by measuring the period of one
cycle of adjacent oscillation peaks (1.7 mm). The damping coefficient is determined
by measuring the heights of adjacent oscillation peaks (17 and 24 mm). From these
measurements, a natural frequency of 14.7 Hz and an amplitude ratio of 0.71 may be
calculated. See the text for greater detail. B,
Relationship between the amplitude ratio and the damping coefficient. The amplitude
ratio determined in the fast-flush test in A corresponds
to a damping coefficient of 0.11. (Redrawn from Mark JB: Atlas of Cardiovascular
Monitoring. New York, Churchill Livingstone, 1998, Figs. 9-9 and 9-10.)
The damping coefficient is determined from the flush artifact by measuring the amplitudes of successive oscillation cycles. The amplitude ratio thus derived indicates how quickly the measuring system comes to rest. A low amplitude ratio corresponds to a high damping coefficient, or a system that comes to rest quickly. Conversely, a high amplitude ratio corresponds to a low damping
Although the technical requirements for accurate blood pressure measurement are well known, these conditions are often unmet in routine clinical practice. Schwid examined the frequency response of 30 radial artery catheter-transducer systems used in routine intensive care monitoring.[122] Mean values (± SD) for natural frequency (14.7 ± 3.7 Hz) and damping coefficient (0.24 ± 0.07) were worse than values typically reported for measurements made under laboratory conditions, instead falling in the underdamped response region reported by Gardner.[111] Furthermore, the range of frequency responses (10.2 to 25.3 Hz) and damping coefficients (0.15 to 0.44) measured in this setting suggests that distortion of the arterial waveform is common in clinical practice, with systolic arterial pressure overshoot resulting from a relatively underdamped system being the most common problem. Figure 32-9 shows these data from Schwid[122] in the format suggested by Gardner[111] and graphically highlights this situation.
Several practical points for direct blood pressure monitoring in daily clinical practice emerge from these technical considerations. First, in an attempt to optimize the dynamic response of the monitoring system, one should try to keep the catheter-tubing-transducer system as simple as possible by using the minimum length of tubing and number of stopcocks required for patient care purposes. Second, one should know how the natural frequency and damping coefficient might be calculated with the fast-flush method. One practical application is that this testing allows the clinician to distinguish true hypotension from an artifact resulting from an excessively damped system caused by a large air bubble or blood clot in the catheter or tubing (see Fig. 32-10 ). A third relates to the clinical interpretation of systolic arterial blood pressure values. Because of the dynamic response limitations of most clinical pressure monitoring systems, direct measurement of systolic arterial pressure often exceeds indirect noninvasive measurement, simply because of underdamping and resonance (see Fig. 32-6 ).
Arterial pressure monitoring systems have a number of components, beginning with the intra-arterial catheter and including extension tubing, stopcocks, in-line blood sampling set, pressure transducer, continuous-flush device, and electronic cable connecting the bedside monitor and waveform display screen. The stopcocks in the system provide sites for blood sampling and allow the transducer to be exposed to atmospheric pressure to establish a zero reference value. Newer systems include needleless blood sampling ports and in-line aspiration systems. These components permit blood drawing without the use of sharp needles and allow the aspirated waste blood to be returned to the patient within a convenient closed system. Modifications such as these are intended to reduce the risk of needle injury and blood exposure to health care workers, as well as decrease waste of the patient's blood during sampling. However, these additional features may degrade the dynamic response of the monitoring system and further exacerbate systolic arterial pressure overshoot.[123]
The flush device provides a continuous, slow (1 to 3 mL/hr) infusion of saline to purge the monitoring system and prevent thrombus formation within the arterial catheter. Historically, a dilute concentration of heparin (1 to 2 U/mL saline) has been added to this flush solution to further reduce the incidence of thrombosis,[124] but this practice increases the risk of heparin-induced thrombocytopenia and is not needed for routine practice. [125] [126]
The flush device not only ensures continuous slow flushing of the line and catheter but also includes a spring-loaded valve that allows periodic, high-pressure flushing to purge the extension line of blood after an arterial sample has been taken. Despite the presence of both slow- and fast-flush systems, pressure monitoring systems appear to undergo a slow degradation in dynamic response over time, with a decrease in natural frequency and increase in damping coefficient.[127] The dynamic response can be restored, however, with periodic "manual" flushing of the system.
Before initiating patient monitoring, the pressure transducer must be zeroed, calibrated, and leveled to the appropriate position on the patient. The initial step in this process is to expose the transducer to atmospheric pressure by opening the adjacent stopcock to air, pressing the zero pressure button on the monitor, and thereby establishing the zero pressure reference value. The transducer now has a reference—ambient atmospheric pressure—against which all intravascular pressures are measured. This process underscores the fact that all pressures displayed on the monitor are referenced to atmospheric pressure, outside the body. Although clinicians generally refer to "zeroing the transducer," the transducer is actually exposed to atmospheric pressure through an open stopcock affixed to the transducer. To be precise, it is this air-fluid interface at the level of the stopcock that is the zero pressure locus. This point must be aligned with a specific position on the patient to ensure the correct transducer level.
When a significant change in pressure occurs, the zero reference value should be rechecked before initiating therapy. Opening the stopcock and exposing the transducer to atmospheric pressure can accomplish this quickly. The monitor should be inspected to ensure that the
Historically, calibration of the transducer was the next step after the zeroing procedure. Calibration is an adjustment in system gain to ensure the proper response to a known reference pressure value. Traditionally, this has been performed by using a mercury manometer as the standard.[51] Currently, however, disposable pressure transducers meet or exceed the accuracy standards established by the AAMI and the American National Standards Institute. [131] Transducer calibration at the bedside thus appears to be unnecessary. By avoiding daily calibration, the attendant serious risks of arterial air embolism and infection may be reduced. In general, if a pressure transducer or monitoring cable is faulty, the initial zero value cannot be established, and the monitoring system must be changed. On rare occasion, despite successful zeroing the recorded pressure values appear erroneous, and a malfunctioning pressure transducer, cable, or monitor must be suspected and replaced.[129] [130] [132] [133]
The final step in transducer setup is leveling the pressure monitoring zero point to the appropriate position on the patient. In general, zeroing and leveling the transducer are accomplished at the same time, before initiating patient monitoring. However, these are two distinct procedures. Zeroing exposes the transducer to ambient atmospheric pressure through an open stopcock. Leveling assigns this zero reference point to a specific position on the patient's body.
In a supine patient, pressure transducers are leveled most often to the midchest position in the midaxillary line,[51] a site chosen because it is easy to estimate by eye and provides a reasonable approximation for the midpoint of the heart in the chest. Although precise location for the zero reference level is important for all pressure monitoring, it is critical for measurement of cardiac filling pressures. An error of 10 mm Hg in arterial blood pressure measurement is generally of minor clinical importance, but the same error in central venous pressure (CVP) or pulmonary artery wedge pressure (PAWP) may have major diagnostic implications.
Despite the common practice of aligning pressure transducers at the midchest level, more accurate pressure monitoring will be achieved if the transducer is aligned approximately 5 cm below the sternal border in the fourth intercostal space.[134] Rather than align the transducer at the "midchamber" or midheart level, this preferred location aligns the transducers with the upper-most blood levels in the cardiac chambers and thereby eliminates the confounding effect of hydrostatic pressure on the measurement of pressure in the cardiac chambers. Courtois and associates have shown that errors in measurement of left ventricular filling pressure of up to 7 mm Hg occur when transducers are leveled to the midchest rather than the top of the left ventricle.[134] Because many critically ill or anesthetized patients have direct arterial pressure measured along with other direct intravascular cardiac filling pressures, it seems prudent to use the same zero reference level for all direct pressure measurements.
In some circumstances, the clinician may choose to level the arterial pressure transducer at a different position on the body. During neurosurgical operations performed with the patient in a seated position, the pressure transducer is often aligned with the patient's ear to approximate the level of the circle of Willis and better estimate cerebral perfusion pressure. The transducer should not need to be rezeroed by pushing the zero pressure button on the monitor because only the reference level has been altered. In fact, if zero is rechecked, it should be unchanged, regardless of transducer location, because atmospheric pressure changes little over the few inches of height alteration being considered in this situation. Arterial blood pressure now recorded at the level of the head will be lower than that recorded at the heart, the difference being precisely equal to the hydrostatic pressure difference between the head and the heart ( Fig. 32-12 ). [128]
Frequently, pressure transducers are attached to an intravenous pole, and patient position is altered by adjusting the height of the operating room table or intensive care bed. Raising the patient above the transducer will produce spuriously high pressures, whereas lowering the patient below the transducer will produce spuriously low pressures. Again, the error introduced is exactly equal to the hydrostatic pressure difference between the patient and transducer. Although these leveling artifacts are generally small relative to the magnitude of arterial blood pressure, they are of critical importance when measuring CVP or pulmonary artery pressure (PAP). Taping pressure transducers directly to the patient can obviate these leveling artifacts. Common major mistakes in pressure monitoring include failure to establish zero, failure to recheck the zero value for transducer drift, and failure to relevel the transducer appropriately after changes in patient position.[51]
Proper interpretation of blood pressure measurements from a patient in the lateral decubitus position requires an understanding of the distinction between zeroing and leveling pressure transducers and the differences between noninvasive and invasive blood pressure measurement ( Fig. 32-13 ). While the patient is supine, blood pressure is 120/80 mm Hg in both arms, as measured by noninvasive cuffs and direct indwelling radial artery catheters. The patient is now placed in the right lateral decubitus position, the left arm is 20 cm above the heart, and the right arm is 20 cm below the heart. The invasive blood pressure transducers remain at the same level in the midthoracic position. Blood pressure measured in the left arm by cuff will be lower, 105/65 mm Hg, because the left arm is 20 cm above the level of the heart, whereas blood
 Figure 32-12
Effect of pressure transducer level on measurement of
blood pressure. A, In a supine patient, the same
arterial blood pressure (ART) is measured at the level of the heart or the brain.
B, With the patient in the sitting position, blood
pressure recorded from a transducer that remains at heart level (#1) will be unchanged,
but blood pressure recorded from a transducer adjusted to the level of the brain
(#2) will be lower by an amount equal to the hydrostatic pressure difference between
these two transducer positions (20 cm H2
O or approximately 15 mm Hg).
(Redrawn from Mark JB: Atlas of Cardiovascular Monitoring. New York, Churchill
Livingstone, 1998, Fig. 9-19.)
Figure 32-12
Effect of pressure transducer level on measurement of
blood pressure. A, In a supine patient, the same
arterial blood pressure (ART) is measured at the level of the heart or the brain.
B, With the patient in the sitting position, blood
pressure recorded from a transducer that remains at heart level (#1) will be unchanged,
but blood pressure recorded from a transducer adjusted to the level of the brain
(#2) will be lower by an amount equal to the hydrostatic pressure difference between
these two transducer positions (20 cm H2
O or approximately 15 mm Hg).
(Redrawn from Mark JB: Atlas of Cardiovascular Monitoring. New York, Churchill
Livingstone, 1998, Fig. 9-19.)
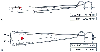 Figure 32-13
Effect of patient position on the relationship between
direct arterial blood pressure (ART) and indirect noninvasive blood pressure (NIBP)
measurements. A, In a supine patient, pressures measured
from the right (R) or left (L) arms by either technique will be the same. B,
In the right lateral decubitus position, ART recorded directly from the right and
left radial arteries will remain unchanged as long as the respective pressure transducers
remain at heart level. However, NIBP will be higher in the dependent right arm and
lower in the nondependent left arm. Differences in NIBP are determined by the positions
of the arms above and below the level of the heart and are equal to the hydrostatic
pressure differences between the level of the heart and the respective arm. A 20-cm
difference in height produces a 15-mm Hg difference in pressure. (Redrawn
from Mark JB: Atlas of Cardiovascular Monitoring. New York, Churchill Livingstone,
1998, Fig. 9-22.)
Figure 32-13
Effect of patient position on the relationship between
direct arterial blood pressure (ART) and indirect noninvasive blood pressure (NIBP)
measurements. A, In a supine patient, pressures measured
from the right (R) or left (L) arms by either technique will be the same. B,
In the right lateral decubitus position, ART recorded directly from the right and
left radial arteries will remain unchanged as long as the respective pressure transducers
remain at heart level. However, NIBP will be higher in the dependent right arm and
lower in the nondependent left arm. Differences in NIBP are determined by the positions
of the arms above and below the level of the heart and are equal to the hydrostatic
pressure differences between the level of the heart and the respective arm. A 20-cm
difference in height produces a 15-mm Hg difference in pressure. (Redrawn
from Mark JB: Atlas of Cardiovascular Monitoring. New York, Churchill Livingstone,
1998, Fig. 9-22.)
Direct arterial pressure monitoring in anesthetized patients began more than 50 years ago.[73] In that early era, arterial pulse waveform analysis was noted to provide useful diagnostic information, but somewhat surprisingly, modern physicians pay little attention to the morphology and detail of the arterial pressure waveform. O'Rourke and Gallagher attribute this change in practice to the reliance on cuff sphygmomanometry, which provides "numbers which came to be linked in a simplistic way to cardiac strength (systolic pressure) and arteriolar
Because clinicians today benefit from the widespread availability of high-resolution, multicolored monitor displays, renewed interest in waveform analysis should expand clinical monitoring capabilities.[74] Appreciation of the diagnostic clues provided by the direct arterial pressure waveform requires full understanding of normal waveform components, their relationship to the cardiac cycle, and differences in waveforms recorded from different sites in the body.
The systemic arterial pressure waveform results from ejection of blood from the left ventricle into the aorta during systole, followed by peripheral arterial runoff of this stroke volume during diastole ( Fig. 32-14 ). The systolic components follow the ECG R wave and consist of a steep pressure upstroke, peak, and decline and correspond to the period of left ventricular systolic ejection. The downslope of the arterial pressure waveform is interrupted by the dicrotic notch, then continues its decline during diastole after the ECG T wave, and reaches its nadir at end-diastole. The dicrotic notch recorded directly from the central aorta is termed the incisura (from the Latin, "a cutting into"). The incisura is sharply defined and is undoubtedly related to aortic valve closure. [136] In contrast, the peripheral arterial waveform generally displays a later, smoother dicrotic notch that only approximates the timing of aortic valve closure and depends more on properties of the arterial wall.[137] Note that the systolic upstroke
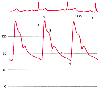 Figure 32-14
Normal arterial blood pressure waveform and its relationship
to the electrocardiographic R wave. 1, Systolic upstroke; 2, systolic peak pressure;
3, systolic decline; 4, dicrotic notch; 5, diastolic runoff; 6, end-diastolic pressure.
(Redrawn from Mark JB: Atlas of Cardiovascular Monitoring. New York, Churchill
Livingstone, 1998, Fig. 8-1.)
Figure 32-14
Normal arterial blood pressure waveform and its relationship
to the electrocardiographic R wave. 1, Systolic upstroke; 2, systolic peak pressure;
3, systolic decline; 4, dicrotic notch; 5, diastolic runoff; 6, end-diastolic pressure.
(Redrawn from Mark JB: Atlas of Cardiovascular Monitoring. New York, Churchill
Livingstone, 1998, Fig. 8-1.)
The bedside monitor displays numeric values for the systolic peak and end-diastolic nadir pressures. Measurement of mean pressure is more complicated and depends on the algorithm used by the monitor.[138] In simplest terms, MAP is equal to the area beneath the arterial pressure curve divided by the beat period and averaged over a series of consecutive heartbeats. Although MAP is often estimated as diastolic pressure plus one third times pulse pressure, this estimation can be misleading. At equivalent heart rates, narrow or thin arterial pressure waveforms spend more time at lower pressures, thereby resulting in low MAP, whereas wide or full arterial pressure waveforms spend more time at higher pressures, thereby resulting in higher MAP.
One of the most important features of the arterial pressure waveform is the phenomenon of distal pulse amplification. Pressure waveforms recorded simultaneously from different arterial sites will have different morphologies because of the physical characteristics of the vascular tree, namely, impedance and harmonic resonance ( Fig. 32-15 ).[44] [135] [139] [140] As the arterial pressure wave travels from the central aorta to the periphery, several characteristic changes occur. The arterial upstroke becomes steeper, the systolic peak becomes higher, the dicrotic notch appears later, the diastolic wave becomes more prominent, and end-diastolic pressure becomes lower. Thus, when compared with central aortic pressure, peripheral arterial waveforms have higher systolic pressure, lower diastolic
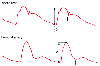 Figure 32-15
Distal pulse wave amplification of the arterial pressure
waveform. When compared with pressure in the aortic arch, the more peripherally
recorded femoral artery pressure waveform demonstrates a wider pulse pressure (compare
1 and 2), a delayed upstroke (3), a delayed, slurred dicrotic notch (compare short
arrows), and a more prominent diastolic wave. (Redrawn
from Mark JB: Atlas of Cardiovascular Monitoring. New York, Churchill Livingstone,
1998, Fig. 8-4.)
Figure 32-15
Distal pulse wave amplification of the arterial pressure
waveform. When compared with pressure in the aortic arch, the more peripherally
recorded femoral artery pressure waveform demonstrates a wider pulse pressure (compare
1 and 2), a delayed upstroke (3), a delayed, slurred dicrotic notch (compare short
arrows), and a more prominent diastolic wave. (Redrawn
from Mark JB: Atlas of Cardiovascular Monitoring. New York, Churchill Livingstone,
1998, Fig. 8-4.)
Pressure wave reflection is the predominant factor that influences the shape of the arterial pressure waveform as it travels peripherally.[135] [139] [141] [142] [143] As blood flows from the aorta to the radial artery, mean pressure decreases only slightly because of little resistance to flow in the major conducting arteries. At the arteriolar level, mean blood pressure falls markedly as a result of the dramatic increase in vascular resistance at this site. This high resistance to flow diminishes pressure pulsations in small downstream vessels but acts to augment upstream arterial pressure pulses because of pressure wave reflection.[144] These intrinsic vascular phenomena determine the shape of the arterial pulse wave recorded from different sites in the body, in both health and disease. For example, elderly patients have reduced arterial distensibility, which results in early return of reflected pressure waves, increased pulse pressure, a late systolic pressure peak, and disappearance of the diastolic pressure wave ( Fig. 32-16 ).
From these considerations, it becomes evident that the morphology of the arterial waveform and the precise values of systolic and diastolic blood pressure vary throughout the body under normal conditions in otherwise healthy individuals. Perhaps of even greater importance, the relationship between central and peripheral arterial pressure varies with age and is altered by various physiologic changes, pathologic conditions, and pharmacologic interventions.
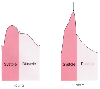 Figure 32-16
Impact of pressure wave reflection on arterial pressure
waveforms. In elderly individuals with reduced arterial distensibility, early return
of reflected waves increases pulse pressure, produces a late systolic pressure peak
(arrow), and attenuates the diastolic pressure wave.
Myocardial oxygen balance is more tenuous in the elderly because these changes in
blood pressure increase myocardial oxygen demand during systole and reduce myocardial
oxygen supply during diastole.
Figure 32-16
Impact of pressure wave reflection on arterial pressure
waveforms. In elderly individuals with reduced arterial distensibility, early return
of reflected waves increases pulse pressure, produces a late systolic pressure peak
(arrow), and attenuates the diastolic pressure wave.
Myocardial oxygen balance is more tenuous in the elderly because these changes in
blood pressure increase myocardial oxygen demand during systole and reduce myocardial
oxygen supply during diastole.
In addition to the normal physiologic phenomena that exert subtle influences on the arterial pressure waveform, a number of pathophysiologic conditions cause exaggerated arterial pressure gradients in the body. Frank and coworkers demonstrated that 21% of patients undergoing peripheral vascular surgery had a blood pressure difference between the two arms that exceeded 20 mm Hg.[145] In view of the prevalence of this problem, when blood pressure is lower in one arm than the other or when the pulses are weaker on one side, one should never insert an arterial catheter on the side with the weaker pulse because determination of blood pressure from this site will probably underestimate true aortic pressure. In addition to atherosclerosis, other pathologic conditions such as arterial dissection or embolism preclude accurate pressure monitoring from the affected sites.
Unusual patient positions during surgery may produce regional arterial compression, and surgical retraction, particularly during cardiothoracic operations, can produce local vascular compression.[146] [147] The nature of the operative procedure is always an important determinant of the appropriate site for arterial pressure monitoring. Operations requiring placement of a descending thoracic aortic cross-clamp may interrupt arterial flow to the left subclavian artery and its tributaries in the left arm, as well as branches of the aorta beyond the clamp. In these cases, blood pressure monitored from the right arm best estimates aortic root pressure and carotid arterial pressure and is used to guide anesthetic management. In addition, pressure may be monitored simultaneously from a femoral artery in an attempt to estimate perfusion pressure to vital organs distal to the aortic cross-clamp.
Various pathophysiologic disturbances may produce generalized arterial pressure gradients in the body and should be considered when choosing a site for arterial pressure monitoring. Large differences in peripheral and central arterial pressure may be seen in patients with shock. Femoral artery systolic pressure may exceed radial artery systolic pressure by more than 50 mm Hg in septic patients who require vasopressor infusions, an observation that has significant therapeutic implications for the management of critically ill patients.[148] Other vasoactive drugs, anesthetics (particularly neuraxial block), and changes in patient temperature produce pressure gradients that alter the relationship between central and peripheral arterial pressure measurements.[44] During hypothermia, thermoregulatory vasoconstriction causes radial arterial systolic pressure to exceed femoral artery systolic pressure, whereas during rewarming, vasodilation reverses this gradient and causes radial artery pressure to underestimate femoral artery pressure.[149]
A similar pressure gradient phenomenon has been described in cardiac surgical patients undergoing cardiopulmonary bypass ( Fig. 32-17 ). Shortly after initiation of cardiopulmonary bypass, mean radial artery pressure is lower than mean femoral artery pressure, and this difference seems to persist during the bypass procedure.[150] [151] Furthermore, in the initial minutes after bypass, radial arterial pressure continues to be lower than central aortic pressure, often by more than 20 mm Hg.[152] [153] [154] [155] [156] [157] [158] In most patients, these pressure differences persist after bypass for
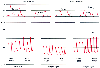 Figure 32-17
Arterial pressure gradients after cardiopulmonary bypass.
A, Femoral and radial artery pressure traces recorded
2 minutes after bypass, when radial artery pressure underestimates the more centrally
measured femoral artery pressure, and 30 minutes after bypass, when radial and femoral
arterial pressures have been equalized and radial pressure has assumed a more typical
morphology. Note that the dicrotic notch (arrows)
is visible in the femoral pressure trace after bypass, but not initially in the radial
pressure trace. B, Femoral and radial artery pressure
traces recorded before cardiopulmonary bypass, 2 minutes after bypass, and 30 minutes
after bypass. Note the changing relationship between femoral and radial artery pressure
measurements at these different times.
Figure 32-17
Arterial pressure gradients after cardiopulmonary bypass.
A, Femoral and radial artery pressure traces recorded
2 minutes after bypass, when radial artery pressure underestimates the more centrally
measured femoral artery pressure, and 30 minutes after bypass, when radial and femoral
arterial pressures have been equalized and radial pressure has assumed a more typical
morphology. Note that the dicrotic notch (arrows)
is visible in the femoral pressure trace after bypass, but not initially in the radial
pressure trace. B, Femoral and radial artery pressure
traces recorded before cardiopulmonary bypass, 2 minutes after bypass, and 30 minutes
after bypass. Note the changing relationship between femoral and radial artery pressure
measurements at these different times.
Detailed examination of the morphologic features of individual
arterial pressure waveforms can provide important diagnostic clues to a variety of
pathologic conditions ( Table 32-4
).
Aortic stenosis produces a fixed obstruction to
left ventricular ejection that results in reduced stroke volume and an arterial pressure
waveform that rises slowly (pulsus tardus) and peaks
late in systole ( Fig. 32-18
).
A distinct shoulder, termed the anacrotic notch,
often distorts the pressure upstroke.[162]
In addition,
the dicrotic
| Condition | Characteristics |
|---|---|
| Aortic stenosis | Pulsus parvus (narrow pulse pressure) |
|
|
Pulsus tardus (delayed upstroke) |
| Aortic regurgitation | Bisferiens pulse (double peak) |
|
|
Wide pulse pressure |
| Hypertrophic cardiomyopathy | Spike and dome (midsystolic obstruction) |
| Systolic left ventricular failure | Pulsus alternans (alternating pulse pressure amplitude) |
| Cardiac tamponade | Pulsus paradoxus (exaggerated decrease in systolic blood pressure during spontaneous inspiration) |
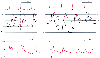 Figure 32-18
Influence of pathologic conditions on arterial pressure
(ART) waveform morphology. A, Normal ART and pulmonary
artery pressure (PAP) waveform morphologies demonstrating the similar timing of these
waveforms relative to the electrocardiographic R wave. B,
In aortic stenosis, the ART waveform is distorted and has a slurred upstroke and
delayed systolic peak. These changes are particularly striking in comparison to
the normal PAP waveform. Note the beat-to-beat respiratory variation in the PAP
waveform. See the text for greater detail. For A
and B, the ART scale is on the left
and the PAP scale is on the right. C,
Aortic regurgitation produces a regurgitation produces a bisferiens pulse and a wide
pulse pressure. See the text for greater detail. D,
An arterial pressure waveform in a patient with hypertrophic cardiomyopathy shows
a peculiar "spike-and-dome" configuration. The pressure waveform assumes a more
normal morphology after surgical correction of this condition. (Redrawn
from Mark JB: Atlas of Cardiovascular Monitoring. New York, Churchill Livingstone,
1998, Figs. 3-3, 17-21, and 17-24.)
Figure 32-18
Influence of pathologic conditions on arterial pressure
(ART) waveform morphology. A, Normal ART and pulmonary
artery pressure (PAP) waveform morphologies demonstrating the similar timing of these
waveforms relative to the electrocardiographic R wave. B,
In aortic stenosis, the ART waveform is distorted and has a slurred upstroke and
delayed systolic peak. These changes are particularly striking in comparison to
the normal PAP waveform. Note the beat-to-beat respiratory variation in the PAP
waveform. See the text for greater detail. For A
and B, the ART scale is on the left
and the PAP scale is on the right. C,
Aortic regurgitation produces a regurgitation produces a bisferiens pulse and a wide
pulse pressure. See the text for greater detail. D,
An arterial pressure waveform in a patient with hypertrophic cardiomyopathy shows
a peculiar "spike-and-dome" configuration. The pressure waveform assumes a more
normal morphology after surgical correction of this condition. (Redrawn
from Mark JB: Atlas of Cardiovascular Monitoring. New York, Churchill Livingstone,
1998, Figs. 3-3, 17-21, and 17-24.)
In aortic regurgitation, the arterial pressure wave displays a sharp rise, wide pulse pressure, and low diastolic pressure as a result of runoff of blood into the left ventricle and the periphery during diastole. Because of the large stroke volume ejected from the left ventricle in this condition, the arterial pressure pulse may have two systolic peaks (bisferiens pulse) (see Fig. 32-18 ). These two peaks represent separate percussion and tidal waves, with the former resulting from left ventricular ejection and the latter arising from the periphery as a reflected wave.[162] The bisferiens pulse is also described in patients with mixed aortic regurgitation and stenosis and in those with hypertrophic cardiomyopathy, although the physiologic basis is different in the latter condition. In hypertrophic cardiomyopathy, the arterial pressure waveform assumes a peculiar bifid shape termed a "spike-and-dome" configuration. After an initial sharp pressure upstroke that results from rapid left ventricular ejection in early systole, arterial pressure falls rapidly as dynamic left ventricular outflow obstruction develops during midsystole, and a late systolic reflected wave follows, thereby creating the characteristic double-peaked waveform (see Fig. 32-18 ).[162] [163]
Observation of arterial waveform patterns over consecutive heartbeats provides an additional set of diagnostic clues. Pulsus alternans is recognized by the alternating beats of larger and smaller pulse pressures ( Fig. 32-19 ). In general, it is considered to be a sign of severe left ventricular systolic dysfunction, often noted in patients with advanced aortic stenosis. It may be seen occasionally during general anesthesia, presumably as a consequence of the anesthetic-induced reduction in sympathetic nervous system activity in patients with underlying impairment in left ventricular contractility.[164] Pulsus alternans should be distinguished from the bigeminal pulse that arises from a bigeminal rhythm, usually ventricular bigeminy. Both abnormalities create an alternating pulse pressure in the arterial pressure waveform, but the rhythm is regular in pulsus alternans.
Pulsus paradoxus is an exaggerated inspiratory fall in systolic arterial pressure that exceeds 10 to 12 mm Hg during quiet breathing (see Fig. 32-19 ). [162] [165] [166] The term may be confusing because a small inspiratory reduction in blood pressure is a normal phenomenon, and pulsus paradoxus is not truly paradoxical, but rather an exaggeration of this normal inspiratory decline in blood pressure.
 Figure 32-19
Beat-to-beat variability in arterial pressure waveform
morphologies. A, Pulsus alternans. B,
Pulsus paradoxus. The marked decline in systolic arterial pressure and pulse pressure
during spontaneous inspiration (arrows) is characteristic
of this condition. (Redrawn from Mark JB: Atlas of Cardiovascular Monitoring.
New York, Churchill Livingstone, 1998, Fig. 18-10.)
Figure 32-19
Beat-to-beat variability in arterial pressure waveform
morphologies. A, Pulsus alternans. B,
Pulsus paradoxus. The marked decline in systolic arterial pressure and pulse pressure
during spontaneous inspiration (arrows) is characteristic
of this condition. (Redrawn from Mark JB: Atlas of Cardiovascular Monitoring.
New York, Churchill Livingstone, 1998, Fig. 18-10.)
The arterial pressure waveform provides diagnostic clues in other more unusual physiologic states. Proper timing of intra-aortic balloon counterpulsation mandates detailed interpretation of the arterial waveform ( Fig. 32-20 ).[168] Even during nonpulsatile cardiopulmonary bypass, the minor variations in blood pressure created by the arterial roller head allow calculation and confirmation of the adequacy of systemic blood flow (see Fig. 32-20 ).[169]
|
|
|
|
|
|
|
|
|
|
|
|
|